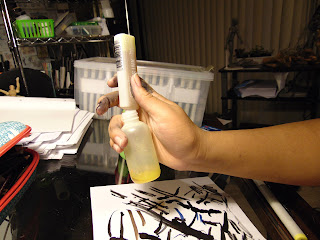
The other week I got some art supplies from
Blick . One of the things I ordered was 2 Various ink copic marker refills.
The instructions I have encountered in various sites were vague information. Until I practiced refilling in theory it seemed easy but let me emphasize the booster needle is ABSOLUTELY necessary. At first I did not bother to buy the needles thinking it was just a marking ploy like the tweezers.

So last week I attempted to refill 2 of my markers that have gone dry. The results for my 1st and 2nd attempt were abysmal and the 3rd hit and miss. The 4th was the charm with much success.
With the first attempt I tried the drip method. This takes a long time and it is hard to gauge how much refill ink you put in the marker. This method was very tedious, and the ink was not refilling my marker.. This way one drips the ink one drop at a time on the chisel point and wait for the ink to absorb. Then I popped the chisel tip off the marker to fill directly to the well and that was where all the mess happened. The ink would fill in the well but would take time to settle causing the overfill. It so happened this was with the T10 toner ink which is a very dark grey.
 |
| Screenshot of Copic Australia's PDF instructions |
 |
Back of the booster needle bag
that had cleared instructions to how much
ink you need to refill. Only a little bit of ink is
needed to refill the marker. |
Attempt number 3 I tried an empty squeeze bottle to fill the well. At first it didn't seem like I added much ink until I waited for gravity to take over and refill the sketch brush end as well. It was still messy but not as messy as the first 2 attempts.
A week later I had to order the booster needles from someplace else and it took about a week to arrive in the mail which I got yesterday. When I tested the Yellow 04 marker I refilled last week. That method was ok and the ink dispersed nicely on both sides. The marker I attempted to refill again was the T10.
Unscrewed various ink refill bottle
Attach the needle to the various ink refill bottle
Viola! It is done with minimal damage and mess.
I didn't have rubbing alcohol to clean the needle afterwards
but used Higgins Pen cleaner, which worked without the smell.
Also make sure you are in a ventilated area before attempting to do this.
I have alot of copic markers that I have bought used and new.
Artist Markers are one of my favorite traditional mediums. I collected
all 156 Prismacolor 4 in 1 chisel tip colors and even have several
brush tip models.
Here are several marker artists that influenced me to take artist marker art seriously.
Takeshi Obata
Obata is known for his work as a mangaka for such manga hits as Death Note and Bakuman to name a few series he was worked on as the illustrator. Obata has drew some of the most dramatic artist drawing illustrations, especially inking.


Oh Great!
Despite doing alot of Ecchi work. Oh Great is an excellent draftsman, especially the foreshortened poses he comes up with.
was an influence with mixed media.
Superb realistic marker art done with prismacolor markers.


Tite Kubo Bleach Series
In high school I was all over this. Too bad the series and the storytelling went to shiz after the saving Rukia arc. It became a typical stereotypical Shonen manga. Besides that the art and the tankoubon covers are very nice compositions.


When I stumbled upon Giap's work in highschool I was instantly blown away. In my senior year I spent all of my christmas money to buy the 48 set of the prismacolor markers. He inspired me to attempt realism in marker work.
Toosan
Too san inspired me to get copic markers in college. Although he is an excellent draftsman his career was ultimately damaged due to plagiarism in his work. He would heavily copy famous mangaka covers without giving credit. He does beautiful work but this destroyed his reputation and copic marker career.


